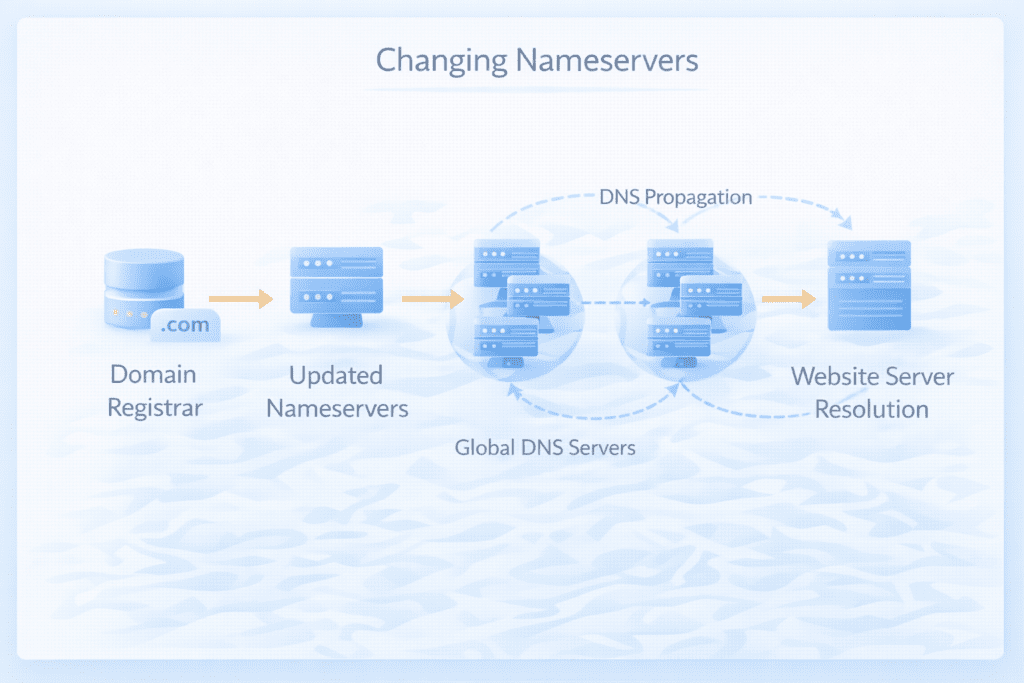
Changing domain nameservers is one of the most important DNS actions when managing a domain. Nameservers control how a domain connects to the server that hosts your website, email services, and other resources. When you change domain nameservers, you are essentially telling the domain name system where to find the correct records for your domain.
The domain name system works by directing domain names to IP addresses. Nameservers store the DNS records that connect your domain to the server where your website is hosted. People often change domain nameservers when switching to a new hosting provider, moving a domain to Cloudflare, or using another DNS provider to manage their DNS settings.
After you change domain nameservers, DNS propagation begins. During this process, DNS servers around the world update their cache so the domain resolves to the new server configuration. This process can take some time while changes propagate globally.
What Are Nameservers in DNS
Nameservers are a core part of DNS. They manage the DNS records that connect a domain name to the correct server.
When someone enters a domain in a browser, the DNS server checks the domain’s nameservers to determine where the website is located. The nameservers then return the correct IP address so the browser can load the website.
Understanding DNS and Nameservers
The domain name system translates domain names into IP addresses. Without DNS, users would need to remember numerical IP addresses instead of domain names.
Nameservers are responsible for storing and managing the DNS records for a domain.
• DNS definition: The domain name system converts domain names to IP addresses so browsers can locate websites.
• Role of nameservers: Nameservers manage DNS records and direct traffic to the correct server.
• Domain resolution: When a user enters a domain name, DNS queries the nameserver to find the website server.
This system allows domains to connect users to the correct server that hosts the website.
Default Nameservers vs Custom Nameservers
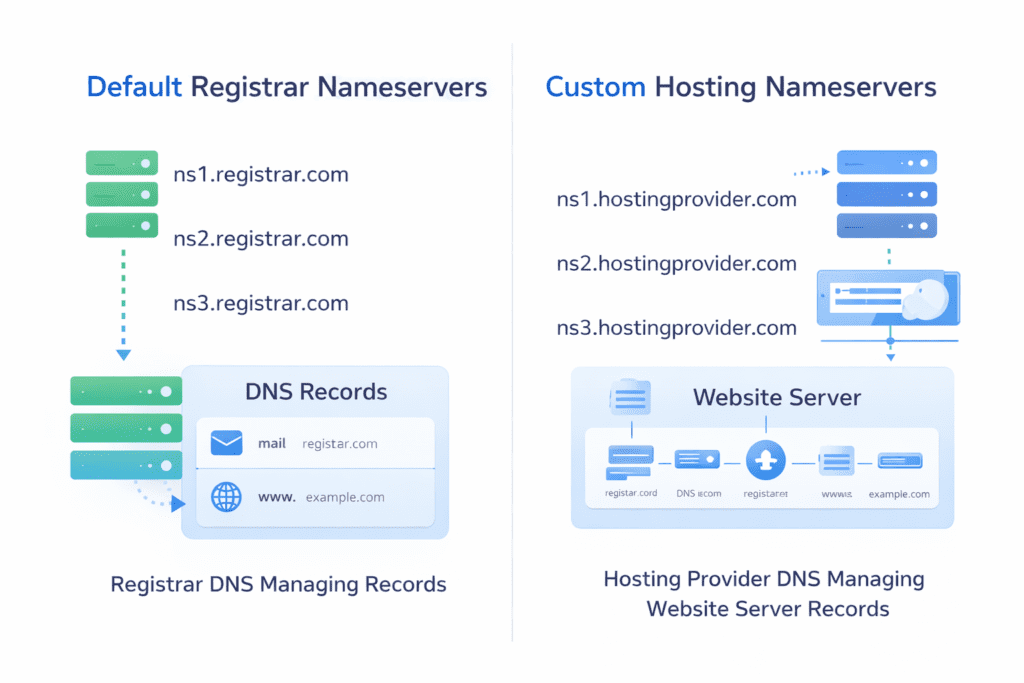
Every domain is assigned default nameservers when it is first registered. These nameservers are usually managed by the domain registrar.
However, many website owners switch to custom nameservers when using a different hosting provider or DNS service.
• Default nameservers: Nameservers are automatically assigned by the domain registrar unless you choose to change the name servers.
• Custom nameservers: Nameservers provided by a hosting provider or third-party DNS provider.
• Registrar DNS vs hosting DNS: Registrar DNS manages records at the registrar, while hosting DNS manages records at the hosting server.
Using custom nameservers allows a hosting provider to manage your DNS records directly.
Nameservers vs DNS Records: What Is the Difference
Nameservers and DNS records are closely related, but they serve different roles within DNS.
Nameservers control where DNS records are stored and which DNS provider manages the domain’s DNS configuration. DNS records themselves define how the domain connects to specific services, which is crucial for a website hosted with third-party nameservers.
Nameservers determine the location of DNS records, while DNS records contain the actual configuration details.
Registrar Nameservers vs Hosting Nameservers
Domains are typically registered with a registrar, while websites are hosted on a separate server. Because of this, domain nameservers can be managed either by the registrar or by the hosting provider.
Registrar nameservers manage DNS settings within the registrar’s interface. Hosting nameservers allow the hosting provider to manage the DNS configuration.
When a website is hosted on a server provided by a hosting provider, switching the domain to the hosting nameservers allows the provider to manage the domain’s DNS records.
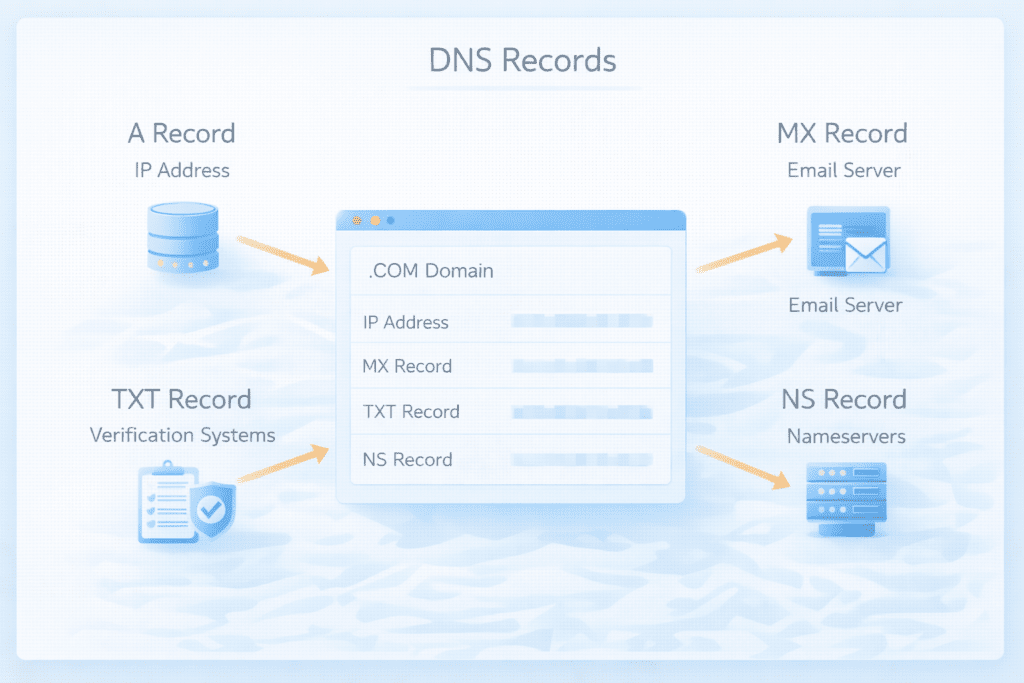
Key DNS Records Managed by Nameservers
Nameservers store several DNS record types that control how a domain connects to different services, including those provided by another provider.
• A records: Connect the domain to a specific IP address where the website server is located.
• MX records: Direct email routing for sending emails associated with the domain.
• TXT records: Store verification data for domain ownership and email authentication.
• NS records: Define the authoritative nameservers responsible for the domain.
When You Should Change Domain Nameservers
There are several situations where you may need to change domain nameservers. Usually, this happens when the domain begins using a different hosting provider or DNS platform.
Changing nameservers tells the domain name system to look for DNS records at a different DNS server. Once the change is applied, the new DNS provider manages records for your domain.
Moving to a New Hosting Provider
One of the most common reasons to change domian nameservers is switching to a new hosting provider. When your website moves to another server, the domain must point to the new infrastructure.
If the domain still uses the old hosting provider’s nameservers, visitors may continue reaching the previous server.
• Connecting to a new hosting provider: Updating nameservers directs the domain to the new hosting server.
• Migrating web hosting services: After migrating your website, the domain must connect to the correct server.
• Updating the hosting environment: The nameservers provided by the hosting provider allow them to manage DNS records.
When the change is complete, the domain connects to the server that hosts your website.
Moving a Domain to Cloudflare
Another common reason to change domain nameservers is moving a domain to Cloudflare. Cloudflare acts as a DNS provider and also offers additional performance and security features.
To use Cloudflare, the domain’s nameservers must point to Cloudflare’s DNS servers.
• Move domain to Cloudflare: Replace the current nameservers with the nameservers provided by Cloudflare.
• Cloudflare DNS benefits: Cloudflare can improve performance and add security features.
• DNS management: After the change, Cloudflare manages the domain’s DNS records.
This setup allows Cloudflare to control the DNS configuration and direct visitors to the correct server.
Switching DNS Management Platforms
Sometimes a domain owner wants to manage DNS records using a different provider. Third party DNS services offer additional tools for managing DNS settings.
Switching DNS platforms requires updating the nameservers so the domain uses the new DNS provider.
• Third party DNS services: Some users prefer external DNS providers for better performance.
• Security improvements: Certain DNS providers offer additional security features.
• Advanced DNS tools: External DNS platforms may provide more control over DNS configuration.
Once the new nameservers are configured, the domain’s DNS records are managed by the selected provider.
Information You Need Before You Change Domain Nameservers
Before updating nameservers, it is important to gather the correct information. Making DNS changes without preparation can cause temporary downtime or missing DNS records.
Having the necessary details ready helps ensure the transition is smooth.
Nameserver Details from Your Hosting Provider
When setting up a hosting account, the hosting provider usually provides the nameservers required to connect the domain.
These nameservers tell the domain where to find the DNS records managed by the hosting provider.
• Primary nameserver: The first nameserver responsible for DNS resolution.
• Secondary nameserver: A backup nameserver that ensures DNS reliability.
• Nameserver information: The hosting provider typically includes these details in the hosting setup instructions.
These nameservers must be entered exactly as provided.
Access to Your Domain Registrar
Nameserver changes are made at the domain registrar where the domain is registered. The registrar provides the interface used to update DNS settings.
Before making changes, you must be able to access the domain management interface.
• Registrar login: Access your account with the registrar.
• Domain management dashboard: Navigate to the domain settings page.
• DNS configuration: Locate the section where nameservers are configured.
Once logged in, you can modify the domain’s nameservers.
Backup Existing DNS Records
Before changing nameservers, it is recommended to copy the existing DNS records. This helps prevent service interruptions after the DNS change.
If the new DNS provider does not automatically import records, they may need to be recreated manually.
• Copy DNS configuration: Save the current DNS record settings.
• Backup MX records: Ensure email routing settings are preserved.
• Save TXT records: Verification records may be required for services such as email authentication.
Backing up DNS records helps avoid problems with email services or domain verification after the nameservers are updated.
Where to Find Nameservers from Your Hosting Provider
Before you change domain nameservers, you need the correct nameserver values provided by your hosting provider. These nameservers tell the domain name system where the DNS records for your domain are managed.
Hosting providers usually include this information during account setup. If you can’t find the nameservers immediately, they are typically available in several common locations.
Nameservers in Hosting Welcome Email
Most hosting providers send a welcome email when a hosting plan is activated. This message usually includes important setup details for the hosting account.
The email often contains the nameservers needed to connect your domain to the hosting server.
• Account activation email: The hosting provider sends login credentials and server information.
• Nameserver details: The email typically lists two nameservers provided by the hosting provider.
• Setup instructions: Some providers include steps explaining how to point your domain to the server.
Checking the welcome email is often the fastest way to find the nameservers provided by your hosting provider.
Nameservers Inside Hosting Interface
Another place to locate nameservers is inside the hosting dashboard. Most hosting platforms provide a management interface where server information and DNS configuration details are displayed.
The hosting interface usually contains the nameserver configuration for your account.
• Hosting dashboard: The control panel displays server information and domain configuration.
• Server information section: Nameservers are often listed alongside the server IP address.
• DNS configuration: The interface may also allow you to manage DNS records for your domain.
If the welcome email is unavailable, the hosting dashboard typically contains the same information.
Nameservers in cPanel
Many hosting providers use cPanel as their control panel. cPanel includes tools that display server configuration and DNS details.
Within cPanel, the nameservers for your hosting account are usually easy to locate.
• Server information panel: cPanel displays the primary nameserver and secondary nameserver.
• Account details: Server configuration information appears in the dashboard.
• DNS management tools: cPanel also allows you to manage DNS records for your domain.
Finding the nameservers inside cPanel helps ensure you use the correct values when updating your domain.
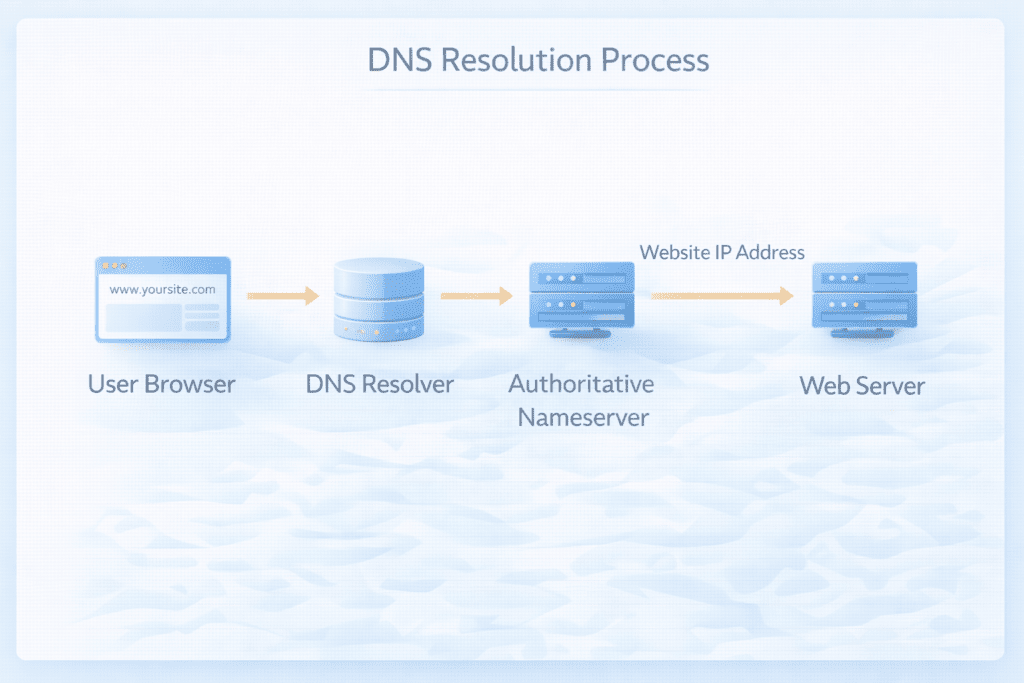
How DNS Works When You Change Domain Nameservers
When you change domain nameservers, you are instructing the domain name system to use a different DNS server to resolve the domain. This change tells the internet where to locate the DNS records for your domain.
Once the update is saved at the domain registrar, DNS servers around the world begin updating their records.
Role of DNS Servers
DNS servers act as directories that translate domain names into IP addresses. When a user enters a domain name in a browser, the DNS server identifies the correct server that hosts the website.
The DNS system uses authoritative nameservers to store the official DNS records for the domain.
• DNS lookup process: The DNS server searches for the authoritative nameserver responsible for the domain.
• Domain resolution: The nameserver returns the IP address of the server hosting the website.
• Traffic routing: The browser connects to the correct server to load the website.
This process allows visitors to access websites using domain names rather than numerical IP addresses.
DNS Propagation Explained
After nameservers are changed, the update must propagate across the global DNS network. During this period, different DNS servers may still reference the previous nameserver configuration.
Propagation occurs because DNS servers temporarily cache DNS information.
• DNS propagation: The process of updating DNS records across global DNS servers.
• Cache updates: DNS servers update their stored records with the new configuration.
• Propagation time can vary when you change the nameservers. The update typically takes between several hours and two days.
During this period, some users may reach the new server while others still connect to the previous server.
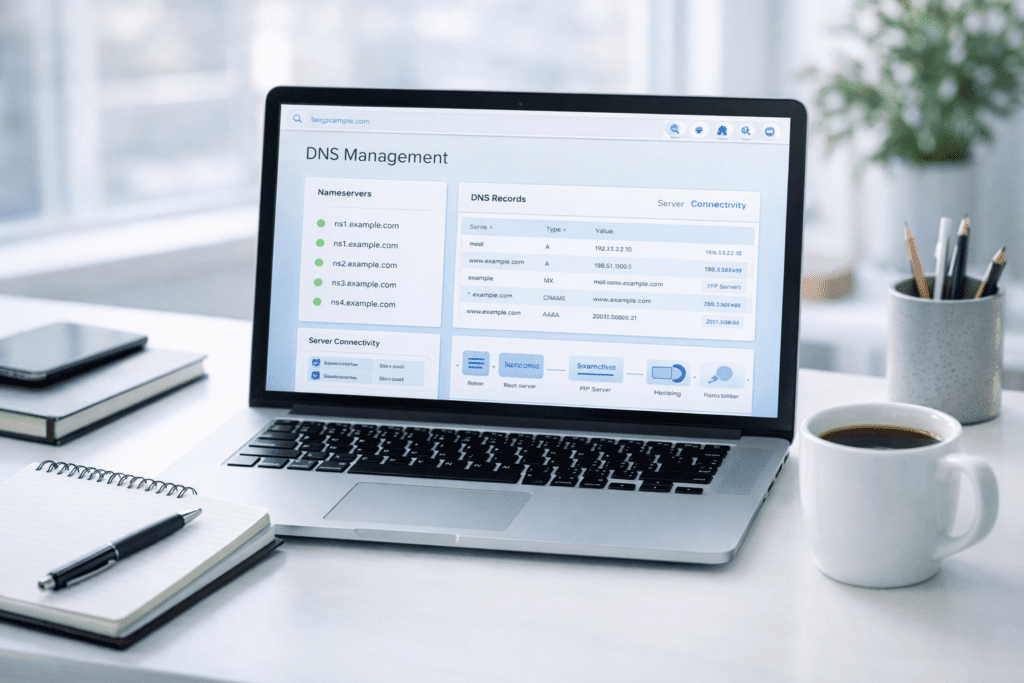
How to Check Current Nameservers for Any Domain
Before making DNS changes, it is helpful to check the current nameservers assigned to a domain. This information confirms which DNS provider is currently managing the domain’s DNS records.
Several tools can perform a DNS lookup to identify the authoritative nameservers.
Online DNS lookup tools allow you to enter a domain name and view the current nameservers associated with that domain.
You can also check the nameservers through the domain registrar’s management interface. The domain overview section usually displays the domain’s nameserver configuration.
Verifying the current nameservers ensures that you are updating the correct DNS configuration when preparing to change domain nameservers.
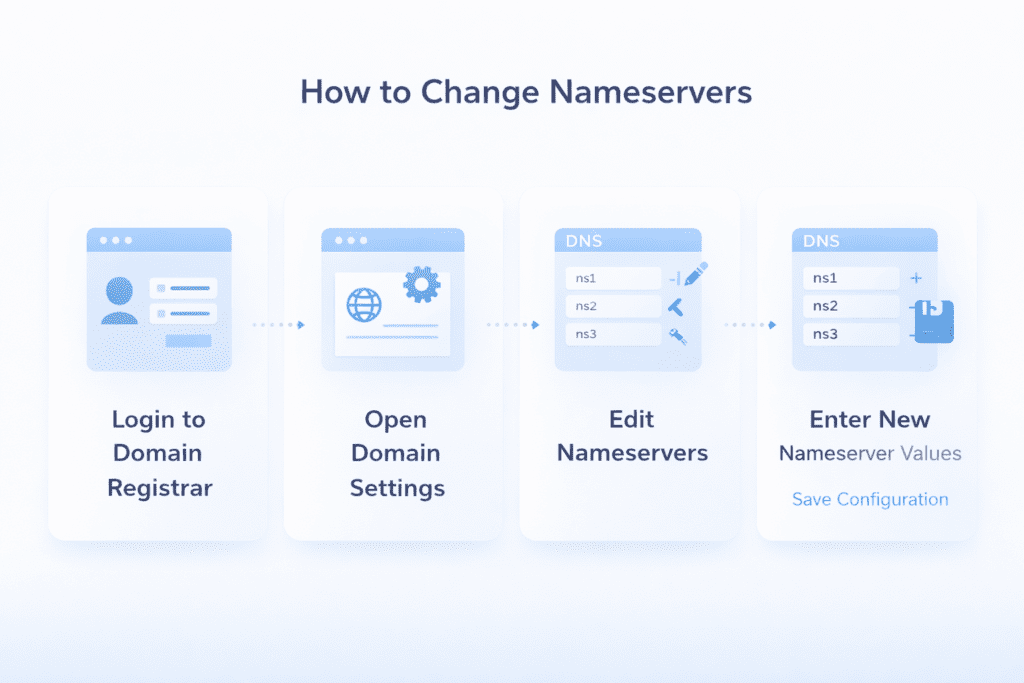
Step-by-Step Guide to Change Domain Nameservers
To change domain nameservers, you need to update the DNS settings at the domain registrar where the domain is registered. The registrar controls the domain’s nameservers and determines which DNS server manages the DNS records.
Once the new nameservers are entered, the domain name system begins updating the configuration.
Step 1: Log In to Your Domain Registrar
The first step is accessing the account where the domain is registered. This is usually the domain registrar that manages the domain registration.
Inside the registrar dashboard, you can access the domain management interface.
Access the Domain Management Interface
• Login to registrar dashboard: Sign in to the account where the domain was registered.
• Open domain settings: Navigate to the domain overview page.
• Locate management tools: The dashboard displays DNS management options.
Locate DNS Settings
Within the domain settings, the nameservers section contains the configuration used to manage DNS.
• Find nameserver configuration: Locate the section that controls the domain’s nameservers.
• Locate NS records: The interface shows the current nameservers assigned to the domain.
These settings determine which DNS server manages records for your domain.
Step 2: Find the Nameserver Settings
After opening the domain management interface, the next step is identifying the existing nameserver configuration.
This helps confirm whether the domain currently uses default nameservers or custom nameservers.
Identify Current Nameservers
• View existing nameservers: Check the current default nameservers assigned to the domain.
• Review DNS configuration: Examine the DNS record setup connected to the domain.
This step ensures you understand the current DNS setup before making changes.
Choose Nameserver Management Option
Most registrars provide options to manage nameservers directly within the domain settings.
• Select nameserver management: Choose the option to change domain nameservers.
• Configure custom nameservers: Switch from default nameservers to custom nameservers if required.
This allows the registrar to accept new nameserver values.
Step 3: Enter New Nameservers
Once the nameserver management option is enabled, the new nameservers can be entered.
These values are typically provided by the hosting provider or DNS provider.
Add New Name Servers
• Enter new nameserver values: Add the primary and secondary nameservers provided by the hosting provider.
• Verify correct spelling: Nameserver entries must match exactly.
Entering incorrect nameservers can prevent the domain from resolving properly.
Save the Configuration
After entering the new nameservers, the DNS settings must be saved.
• Confirm DNS updates: Apply the new nameserver configuration.
• Save changes: The registrar will update the domain’s DNS settings.
Once the update is submitted, DNS servers begin processing the change.
Step 4: Verify DNS Settings
After the configuration is saved, it is important to verify that the DNS settings are correct.
This helps ensure that the domain connects to the correct server, especially when using custom DNS settings.
Check DNS Records
• Confirm MX records: Verify email routing settings.
• Verify TXT records: Confirm domain verification and authentication records.
• Confirm NS configuration: Ensure the domain is using the correct nameservers.
Checking these records helps prevent service interruptions.
Confirm Server Connection
Finally, verify that the domain resolves to the correct server.
• Check domain resolution: Ensure the domain connects to the hosting server.
• Verify website access: Confirm that the website loads correctly.
If the DNS configuration is correct, the domain should resolve properly once DNS propagation is complete.
How to Change Domain Nameservers at Popular Domain Registrars
Changing nameservers usually happens at the domain registrar where the domain is registered. Each registrar uses a slightly different interface, but the general process remains similar.
The domain overview page normally contains the nameservers section where DNS settings can be modified.
Example Process at Common Registrars
Most registrars follow a similar workflow when you change domain nameservers.
• Log in to the registrar account: Access the dashboard where the domain is managed.
• Open the domain overview: Locate the domain settings interface.
• Find the nameservers section: Identify the field that displays the current nameservers.
• Enter the new nameservers: Replace the existing nameserver values with the nameservers provided by your hosting provider.
• Save the changes: Apply the DNS configuration so the update can propagate.
Registrars such as GoDaddy and Namecheap follow a similar process. The nameservers section typically appears inside the DNS settings page.
How to Change Domain Nameservers Using cPanel
Sometimes domain owners manage DNS records directly inside the hosting control panel. cPanel is one of the most commonly used control panels for web hosting environments.
While nameservers are normally changed at the registrar, cPanel allows you to manage the DNS records associated with the domain.
Access DNS Zone Editor
The DNS zone editor inside cPanel allows you to manage your DNS records for your domain registered with a specific registry.
• Login to cPanel: Access the hosting control panel provided by the hosting provider.
• Open DNS zone editor: Navigate to the DNS management tool.
• Select the domain: Choose the domain that you want to configure.
The DNS zone editor displays the DNS records for the selected domain.
Configure DNS Records
Once the DNS zone editor is open, you can modify the DNS record configuration associated with the domain.
• Modify DNS record: Update records connected to the domain.
• Edit MX records: Adjust email routing configuration.
• Update TXT records: Configure verification or authentication records.
Managing DNS records through cPanel helps ensure that the domain resolves correctly to the hosting server.
How to Change Domain Nameservers Without Downtime
DNS changes can sometimes cause temporary downtime if records are not configured properly. Preparing the DNS configuration before updating nameservers helps prevent service interruptions.
One important step is copying the existing DNS records before making any changes.
If the new DNS provider does not automatically import DNS records, you may need to recreate them manually.
Reducing the TTL value before changing nameservers can also help reduce the time required for DNS propagation.
By preparing the DNS configuration in advance, you can update nameservers without affecting website availability.
How to Configure Custom Nameservers
Some hosting providers allow users to configure custom nameservers. This feature is often used by hosting resellers or companies managing their own DNS infrastructure.
Custom nameservers allow the domain to use branded DNS servers instead of the default nameservers.
Creating Custom Nameservers
To create custom nameservers, the nameserver hostnames must be registered with the domain registrar.
• Register custom nameservers: Create nameserver hostnames connected to the domain.
• Assign server IP addresses: Each nameserver must be linked to a server IP address.
• Update DNS configuration: The custom nameservers must be added to the domain settings.
Once registered, the domain can use these custom nameservers to manage DNS records.
When Custom Nameservers Are Needed
Custom nameservers are usually required when operating hosting infrastructure or reseller hosting services.
• Hosting resellers: Reseller hosting providers often create branded nameservers.
• Private DNS infrastructure: Organizations managing their own DNS environment may use custom nameservers.
This configuration allows businesses to maintain control over DNS management.
DNSSEC Considerations When Changing Nameservers
DNSSEC adds a security layer to the domain name system by verifying DNS responses, especially when using custom DNS configurations. It protects domains from certain types of DNS attacks.
However, DNSSEC can interfere with DNS changes if it is not configured properly.
What Is DNSSEC
DNSSEC is a security extension for DNS that ensures DNS responses are authentic.
It uses cryptographic signatures to verify that DNS records have not been altered.
Disable DNSSEC Before DNS Changes
Before changing nameservers, DNSSEC should usually be disabled at the registrar.
• Temporarily disable DNSSEC: Disable the DNSSEC configuration before updating nameservers.
• Remove DS records: Ensure DS records associated with the domain are removed.
Disabling DNSSEC helps prevent DNS resolution errors during the transition.
Re-enable DNSSEC After Changing Nameservers
Once DNS propagation is complete and the new DNS configuration is verified, DNSSEC can be enabled again.
• Re-enable DNSSEC: Activate DNSSEC in the registrar dashboard.
• Verify DNS security: Confirm the DNSSEC configuration is correct.
Proper DNSSEC configuration helps maintain DNS security after you change the nameservers.
DNS Records to Check After You Change Domain Nameservers
After you change domain nameservers, the new DNS provider becomes responsible for managing DNS records. If the correct records are missing, the domain may not connect to the correct services.
Reviewing key DNS records ensures that the domain continues working properly after the DNS changes.
A Records
A records connect the domain to the IP address of the server that hosts the website.
If the A record is incorrect, the domain may not resolve to the correct server.
• Website IP configuration: The A record must point to the correct server IP address.
• Domain resolution: The domain uses this record to locate the server hosting the website.
MX Records
MX records control email routing for the domain. These records determine where incoming emails are delivered.
If MX records are missing or incorrect, sending emails and receiving messages may stop working.
• Email routing configuration: MX records must point to the correct email servers.
• Mail delivery can be affected by how you manage your DNS records. Email services rely on these records to route messages.
TXT Records
TXT records store verification data used by many services. These records are often used for domain verification and email authentication.
• Domain verification: Services may require TXT records to confirm domain ownership.
• Email authentication: TXT records are commonly used for SPF, DKIM, and DMARC settings.
NS Records
NS records define the authoritative nameservers responsible for the domain.
These records confirm which DNS provider manages the domain’s DNS configuration.
• Authoritative nameservers: NS records must match the nameservers configured at the registrar.
• DNS management: These records confirm the DNS provider controlling the domain.
Checking these DNS records ensures that the domain works correctly after updating nameservers.
Tools to Check DNS Records and Nameservers
Several tools can help verify DNS records and nameservers. These tools perform DNS lookups to confirm the current DNS configuration.
DNS lookup tools allow you to check A records, MX records, TXT records, and nameservers for any domain.
These tools are useful when verifying DNS changes or troubleshooting DNS configuration problems.
Online DNS checkers can also help identify DNS propagation progress across global DNS servers.
How to Verify Nameservers After You Change Domain Nameservers
Once the DNS configuration is updated, it is important to verify that the domain is using the correct nameservers.
Check NS Records
The first step is checking the NS records associated with the domain.
• Verify NS records: Confirm the domain is using the new nameservers.
• Confirm authoritative nameserver: Ensure the correct DNS provider manages the domain.
DNS lookup tools can display the nameservers currently assigned to the domain.
Use DNS Lookup Tools
DNS lookup tools allow you to query global DNS servers to confirm the DNS configuration.
These tools show whether the new nameservers are recognized by DNS servers worldwide.
Checking multiple DNS servers helps confirm that the configuration is correct.
Monitor DNS Propagation
DNS propagation occurs after you change domain nameservers. During this period, DNS servers update their cache with the new configuration.
Monitoring propagation helps confirm when the DNS changes have fully propagated.
DNS Propagation: What Happens After You Change Domain Nameservers
When nameservers are updated, the DNS changes must propagate across the global DNS network.
How DNS Propagation Works
DNS servers temporarily cache DNS information to improve performance. When nameservers are changed, these cached records must update.
As DNS servers refresh their cache, the new DNS configuration becomes active.
DNS Propagation Time
Propagation time varies depending on DNS caching and server refresh intervals.
In most cases, DNS propagation can take between 1 and 48 hours.
During this time, some users may still reach the old server while others connect to the new server.
How to Check DNS Propagation
Several online tools can check DNS propagation for a domain.
These tools query multiple DNS servers around the world to determine whether the new nameservers are active.
Troubleshooting DNS Propagation Issues
Sometimes DNS propagation takes longer than expected. This can happen because of caching or incorrect DNS configuration.
Delayed DNS Propagation
DNS propagation delays can occur if DNS servers continue using cached records.
• DNS caching problems: Cached records may still reference the old nameservers.
• Resolver delays: Some DNS resolvers update their cache more slowly.
Clearing Local DNS Cache
Local DNS cache stored on your computer or browser may also cause delays when accessing a domain.
• Clear browser cache: Refresh cached DNS records stored by the browser.
• Clear system DNS cache: Reset DNS cache on your operating system.
Clearing local cache helps ensure the browser retrieves updated DNS records.
Checking DNS Configuration
If DNS propagation problems continue, it is important to verify the DNS configuration.
• Verify DNS records: Ensure DNS record settings are correct.
• Confirm nameservers: Make sure the correct nameservers are assigned to the domain.
Correct DNS configuration helps prevent resolution issues.
What Happens If You Enter the Wrong Nameservers
Entering incorrect nameservers can prevent the domain from resolving correctly. This may affect website access and email services.
Website Downtime
If the domain points to incorrect nameservers, the DNS server may not return the correct IP address.
This can cause the website to become temporarily unavailable.
Email Failures
Email services rely on correct MX records and DNS configuration.
If nameservers are incorrect, MX records may not be recognized, which can interrupt email routing.
DNS Errors
Incorrect DNS configuration can cause DNS errors when browsers attempt to resolve the domain.
Ensuring the correct nameserver values helps prevent these problems.
What Most People Miss When They Change Domain Nameservers
Updating nameservers may seem simple, but several details are often overlooked.
Email services can stop working if MX records are not copied to the new DNS provider. SSL verification may also fail if required DNS records are missing.
DNS caching can also delay updates, which may cause confusion when testing the domain after making DNS changes.
Reviewing DNS records carefully helps prevent these issues.
Common Mistakes When Changing Nameservers
Several mistakes can cause DNS problems during nameserver changes.
• Entering incorrect nameservers: Typographical errors can prevent the domain from resolving.
• Forgetting to copy DNS records: Missing records can interrupt website or email services.
• Not waiting for DNS propagation: DNS updates may take time to propagate globally.
• Ignoring MX records: Email routing can fail if MX records are missing.
• Leaving DNSSEC enabled: DNSSEC may cause validation errors during DNS changes.
Avoiding these mistakes helps ensure a smooth DNS transition.
Frequently Asked Questions
What does it mean to change domain nameservers?
Changing nameservers updates the DNS configuration so that a different DNS provider manages the domain’s DNS records.
How long does DNS propagation take after you change domain nameservers?
DNS propagation typically takes between 1 and 48 hours depending on caching and DNS server refresh intervals.
Will my website go down if I change name servers?
If DNS records are configured correctly before the change, the website should continue working during DNS propagation.
Can I change domain nameservers at my domain registrar?
Yes. Nameservers are managed through the domain registrar where the domain is registered.
Do I need to update DNS records after I change your nameservers?
If the new DNS provider does not automatically import DNS records, you may need to recreate the DNS records manually.
How do I move a domain to Cloudflare using nameservers?
To move a domain to Cloudflare, update the domain’s nameservers to the nameservers provided by Cloudflare.
What happens to MX records when you change domain nameservers?
If MX records are not copied to the new DNS provider, email services may stop working.
Final Thoughts on How to Change Domain Nameservers
Changing domain nameservers is an important DNS operation that connects a domain to the correct DNS provider and hosting environment.
Following the correct steps ensures that the domain resolves properly and that website and email services continue working.
After updating nameservers, it is important to verify DNS records and allow time for DNS propagation before testing the domain.
Careful preparation and verification help ensure that the DNS transition happens smoothly.