
Your emails aren’t reaching inboxes, and it’s costing you money. Many businesses overlook the critical role of email authentication, assuming their messages will just get through. But with stricter spam filters and a constant threat of cyberattacks, understanding SPF DKIM DMARC explained isn’t just a technical detail – it’s a fundamental requirement for reliable communication and protecting your brand. Without these protocols, your legitimate emails risk being flagged as spam, or worse, your domain could be exploited by phishers.
This guide breaks down SPF, DKIM, and DMARC – the three core pillars of email authentication. We will explain what each protocol does, why they are critical for your email deliverability and security, and how they work together to protect your domain from spoofing and phishing attacks. You’ll leave with a clear understanding of how to implement them for better email performance.
What Are SPF, DKIM, and DMARC? (And Why They Matter)
The Core Problem: Email Spoofing and Phishing
Email remains a primary communication channel, but it’s also a major vector for cyberattacks. The biggest threats are email spoofing and phishing. Spoofing is when an attacker sends an email that appears to come from your domain, even though it didn’t. They fake the “From” address in the email header. Phishing attacks often leverage this spoofing to trick recipients into revealing sensitive information or clicking malicious links.
Imagine a fake invoice from your company, or an urgent request from your CEO, all sent from an unauthorized server. These attacks erode trust, damage your brand’s reputation, and can lead to significant financial losses for your customers or even your own business. Without proper email security, your domain is an open target for these malicious activities.
How Email Authentication Solves This Problem
Email authentication protocols are essentially digital signatures and checks that verify the sender of an email. They act as gatekeepers, allowing recipient mail servers to confirm that an incoming email genuinely originated from the domain it claims to be from. This validation process helps prevent email spoofing by providing a mechanism for the receiving server to check if the sender is authorized. When you properly set up SPF, DKIM, and DMARC, you’re telling the world, “Only these specific servers are allowed to send email from my domain, and here’s how you can verify it.” This drastically reduces the chances of malicious actors impersonating your sender identity.
> Crucial Takeaway: Implementing email authentication isn’t just about technical compliance; it’s about building a verifiable trust signal for every email you send, directly combating the rise of sophisticated phishing and spoofing attacks.
The “Three-Legged Stool” Analogy for Email Security
Think of SPF, DKIM, and DMARC as the three legs of a sturdy stool, providing comprehensive email security and authentication for your domain. Each protocol plays a distinct but complementary role. SPF (Sender Policy Framework) verifies the IP address of the sending server against a list of authorized servers published in your domain’s DNS records. DKIM (DomainKeys Identified Mail) adds a cryptographic signature to your email header, allowing the recipient server to verify that the email content hasn’t been tampered with in transit and that it truly came from your domain. Finally, DMARC (Domain-based Message Authentication, Reporting, and Conformance) ties SPF and DKIM together.
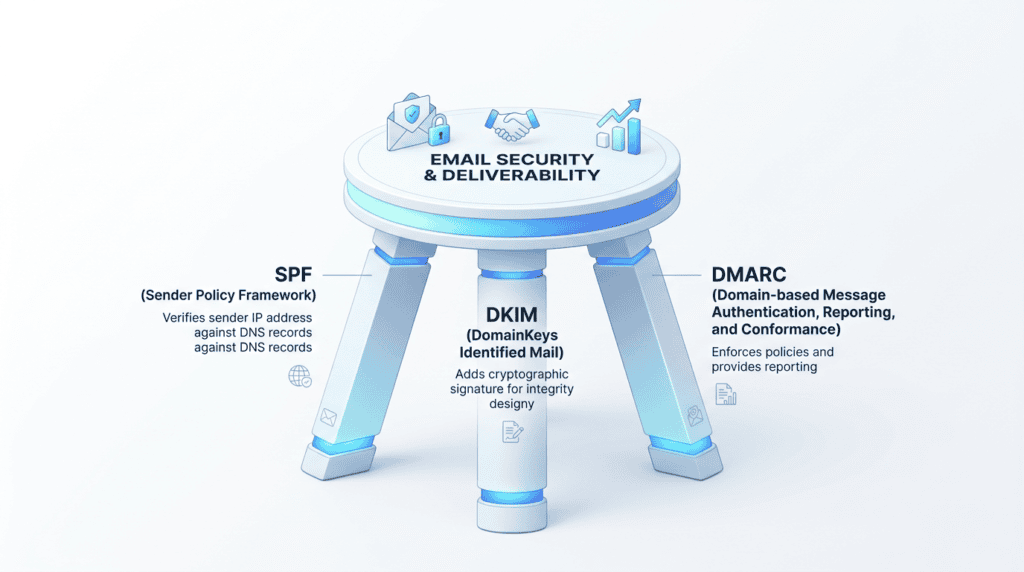
It tells receiving mail servers what to do if an email fails these authentication checks (e.g., quarantine it, reject it, or simply monitor it) and provides valuable reports on email activity for your domain. Without all three, the stool is wobbly, leaving gaps in your email security. For instance, I once saw a client who had SPF and DKIM set up, but no DMARC policy. Their emails were still getting spoofed because there was no instruction for receiving servers on how to handle authentication failures.
The Direct Impact on Email Deliverability and Inbox Placement
Beyond security, these email authentication protocols have a profound impact on your email deliverability rates and overall inbox placement. Major email providers like Google and Yahoo now heavily weigh the presence and correctness of SPF, DKIM, and DMARC when deciding whether to deliver your email to the inbox or shunt it to the spam folder. A properly configured setup signals to these filters that your emails are legitimate and trustworthy. Conversely, a lack of these DNS records, or misconfigured ones, raises red flags, harming your sender reputation and leading to lower inbox placement. This means fewer people see your marketing messages, transactional emails, or important communications. It’s a direct hit to your engagement and conversions.
SPF Explained: Verifying The Sender’s IP Address
Email authentication starts with SPF, or Sender Policy Framework. It’s the first line of defense against email spoofing and helps receiving mail servers confirm that an email truly came from an authorized sender. Without it, your domain is an open invitation for spammers to impersonate you.
What is SPF (Sender Policy Framework)?
SPF is an email authentication protocol that allows a domain owner to specify which mail servers are authorized to send email on behalf of their domain. You publish this information as a special DNS TXT record in your domain’s DNS zone file. When a receiving server gets an email from your domain, it performs an SPF lookup to check this record. This simple check helps prevent unauthorized senders from using your domain to send spam or phishing emails. It’s a foundational piece of email security.
How an SPF Record Works in Practice
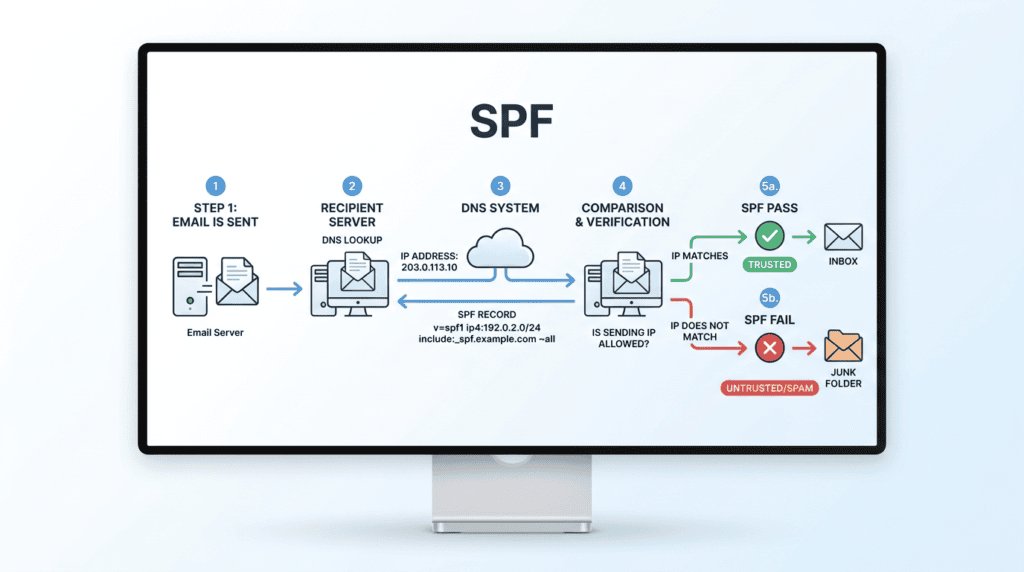
Understanding the steps involved in an SPF check helps clarify its importance for email deliverability. It’s a quick, automated process that happens every time an email is sent.
Step 1: You send an email.
When you send an email from your domain, say `yourdomain.com`, your mail server initiates the sending process. This email carries your domain’s identity, including the “Return-Path” address, which is what SPF primarily checks.
Step 2: The receiving mail server checks your domain’s DNS for an SPF record.
Upon receiving your email, the recipient’s mail server doesn’t just accept it. It pauses to perform a DNS lookup for your domain’s SPF record. This record, a TXT record, lists all the IP addresses and mail servers permitted to send email for `yourdomain.com`.
Step 3: The server compares the sending IP address to the list in your SPF record.
The receiving server then takes the IP address of the server that actually sent the email and compares it against the list of authorized IP addresses and domains specified in your SPF record. It’s looking for a match.
Step 4: The email passes or fails the SPF check.
If the sending IP address is found in your SPF record, the email passes the SPF authentication check. If it’s not listed, the email fails. The outcome of this check influences the email’s spam score and its chances of landing in the recipient’s inbox rather than the spam folder.
SPF Record Syntax: A Simple Breakdown (`v=spf1`, `ip4`, `include`, `~all`, `-all`)
An SPF record might look like a jumble of characters, but each part has a specific function. Understanding these tags is key to proper SPF setup.
- `v=spf1`: This is always the starting point. It identifies the TXT record as an SPF record and specifies the version of SPF being used. Every SPF record must begin with this tag.
- `ip4`: This mechanism allows you to authorize specific IPv4 addresses or IP ranges. For example, `ip4:192.0.2.1` authorizes a single IP, while `ip4:192.0.2.0/24` authorizes a range. This is common for your own dedicated mail servers.
- `include`: This is crucial for authorizing third-party email services. If you use an email marketing platform like Mailchimp or a transactional email provider like SendGrid, you’ll `include` their SPF records. For instance, `include:servers.mcsv.net` tells receiving servers to also check Mailchimp’s authorized senders. This is vital for email deliverability rates when using external providers.
- `~all` (SoftFail): This mechanism suggests that emails from unauthorized servers *might* be legitimate but should be treated with suspicion. They’ll likely be marked as spam or quarantined. It’s a more lenient policy, often used during initial SPF setup or for domains that send email from many varied sources.
- `-all` (HardFail): This is the strongest policy. It explicitly states that any email coming from an IP address not listed in your SPF record should be rejected. This significantly boosts email security and helps prevent email spoofing, but it requires careful configuration to avoid legitimate emails being blocked.
> Strategic Takeaway: Always start with `~all` when first setting up SPF to monitor impact, then transition to `-all` once you’re confident all legitimate sending sources are included.
Common SPF Mistakes to Avoid (The 10 DNS Lookup Limit)
One of the most frequent and critical errors in SPF configuration is exceeding the 10 DNS lookup limit. Each `include` mechanism, `a` mechanism, or `mx` mechanism in your SPF record counts as one DNS lookup. If your record requires more than 10 lookups to resolve all authorized IP addresses, receiving mail servers will often treat your SPF record as invalid and fail the SPF check, even for legitimate emails. This can severely impact your inbox placement rate.
Other common mistakes include:
- Multiple SPF Records: A domain should only have one SPF TXT record. Multiple records will cause authentication failures. Combine all authorized sources into a single record.
- Incorrect Syntax: Typos or misformatted entries can render the entire record useless. Use an SPF record generator or validator tool to double-check your syntax.
- Forgetting to Update: When you add a new email service provider or change your mail server, you must update your SPF record. Neglecting this leads to legitimate emails failing SPF.
When Does SPF Fail? (Forwarded Emails and Third-Party Services)
SPF is effective, but it has limitations. One significant challenge arises with email forwarding. When an email is forwarded, the “Return-Path” often changes to the forwarding server’s address. If this forwarding server isn’t included in the original sender’s SPF record, the SPF check will fail, even though the original email was legitimate. This is a common reason why some forwarded emails end up in spam.
Another scenario where SPF can be tricky is with third-party email services. If you use a service like HubSpot, ActiveCampaign, or even Google Workspace (which has its own SPF `include`), you must explicitly add their sending IP addresses or `include` mechanisms to your SPF record. I’ve personally seen campaigns fail to reach the inbox simply because a client forgot to add their new email marketing platform’s `include` to their domain’s SPF record, leading to widespread SPF hard fails. It’s a crucial step in the SPF DKIM DMARC setup process.
DKIM Explained: Digitally Signing Your Emails
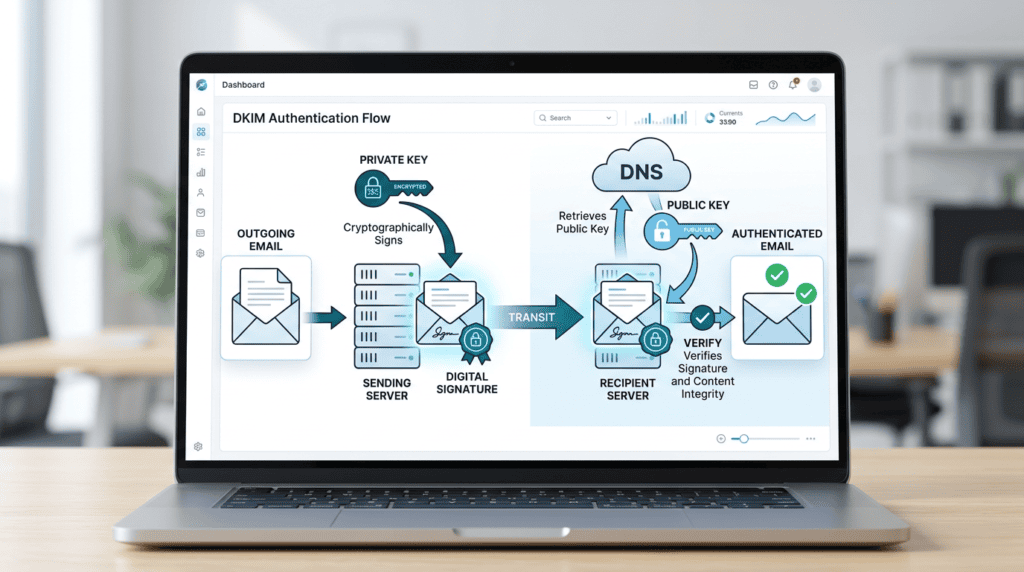
While SPF verifies the sender’s IP address, DKIM (DomainKeys Identified Mail) takes email authentication a step further by ensuring the email’s content hasn’t been tampered with during transit. Think of it as a digital wax seal on your email.
What is DKIM (DomainKeys Identified Mail)?
DKIM is an email authentication method designed to detect email spoofing and tampering. It allows the sender to cryptographically sign outgoing emails. This signature is then verified by the receiving mail server using a public key published in the sender’s DNS records. If the signature is valid, it confirms that the email truly originated from the claimed domain and that its content hasn’t been altered since it was signed. This cryptographic signature is a powerful tool for email security.
How a DKIM Signature Works: The Digital Wax Seal
The process of DKIM signing and verification involves a pair of cryptographic keys and a DNS lookup.
Step 1: A unique digital signature (private key) is added to your email’s header.
When an email leaves your mail server, a unique digital signature is generated using a private key that only your sending server possesses. This signature is then embedded into the email’s header. This signature is based on the content of the email, including specific header fields and the body.
Step 2: The receiving server uses the public key from your DNS record to verify the signature.
The recipient’s mail server sees the DKIM signature in the email header. It then performs a DNS lookup for your domain to find the corresponding public key. This public key is published as a TXT record in your domain’s DNS, usually under a specific hostname that includes a “selector.” The receiving server uses this public key to decrypt the digital signature.
Step 3: A match confirms the email hasn’t been altered in transit.
If the decrypted signature matches the email’s content (i.e., the hash of the email’s content generated by the receiving server matches the decrypted signature), the DKIM check passes. This confirms two things: the email was indeed sent by an authorized server for that domain, and its content (including key headers) has remained intact since it was signed. If there’s a mismatch, the DKIM validation fails, indicating potential tampering or spoofing.
Understanding DKIM Selectors and Why They’re Used
A DKIM selector is a specific name that identifies a particular public key within your domain’s DNS. When you set up DKIM, your email service provider (ESP) or mail server will give you a selector (e.g., `s1`, `default`, `google`). This selector is part of the hostname where your public key is published (e.g., `s1._domainkey.yourdomain.com`).
Selectors are used for several practical reasons:
- Multiple Sending Services: You might use different email services (e.g., one for marketing, one for transactional emails, one for internal mail). Each service can have its own unique DKIM selector and public/private key pair. This allows you to manage and revoke keys independently without affecting other services.
- Key Rotation: For security best practices, it’s wise to periodically rotate your DKIM keys. Selectors allow you to publish a new key under a new selector while the old one is still active, ensuring a smooth transition without interrupting email flow.
- Troubleshooting: If a DKIM signature fails, the selector helps identify which key and, by extension, which sending service might be experiencing an issue.
The Key Benefit: Protecting Against Email Tampering and “Man-in-the-Middle” Attacks
The primary advantage of DKIM is its ability to ensure the integrity of an email. Because the digital signature is based on the email’s content, any alteration to the email body or critical headers after it’s been signed will cause the DKIM verification to fail. This makes it incredibly difficult for attackers to perform “man-in-the-middle” attacks where they intercept and modify an email before it reaches the recipient. DKIM provides a strong defense against phishing attacks that rely on altering email content to trick recipients.
> Critical Warning: A valid DKIM signature doesn’t guarantee the sender is trustworthy, only that the email hasn’t been changed since it left the signing server.
DMARC Explained: Creating a Policy for Authentication Failures
DMARC (Domain-based Message Authentication, Reporting, and Conformance) acts as the overarching policy layer that ties SPF and DKIM together. It tells receiving mail servers what to do with emails that fail SPF or DKIM authentication and provides valuable reporting back to the domain owner.
What is DMARC (Domain-based Message Authentication, Reporting, and Conformance)?
DMARC is an email authentication protocol that builds on SPF and DKIM. It allows domain owners to instruct receiving mail servers on how to handle emails that fail authentication checks. Crucially, DMARC also provides a reporting mechanism, sending aggregate and forensic reports back to the domain owner. These reports offer insights into who is sending email on behalf of your domain, including legitimate senders and potential spoofers. It’s a powerful tool for monitoring and improving your email sender reputation and overall email security.
How DMARC Connects SPF and DKIM
DMARC doesn’t replace SPF or DKIM; it leverages their results. When a receiving server gets an email, it first performs SPF and DKIM checks. DMARC then takes these results and applies a policy based on whether *either* SPF or DKIM (or both) passed, and critically, if they passed with “alignment.” If an email fails both SPF and DKIM, or if they pass but don’t align with the “From” header, DMARC’s policy dictates the next action. This connection makes DMARC a robust framework for email authentication protocols.
The Two Core Functions of DMARC: Reporting and Policy Enforcement
DMARC serves two vital purposes for domain owners:
- Reporting: This is often overlooked but incredibly valuable. DMARC allows you to specify email addresses (using `rua` for aggregate reports and `ruf` for forensic reports) where receiving servers send data about emails claiming to be from your domain.
- Aggregate Reports (RUA): These are XML files sent daily, providing an overview of all emails received by participating mail servers that claim to be from your domain. They show how many emails passed or failed SPF and DKIM, which IP addresses sent them, and what policy was applied. These reports are essential for identifying legitimate sending sources you might have missed in your SPF or DKIM setup, as well as detecting unauthorized spoofing attempts.
- Forensic Reports (RUF): These are less common and contain more detailed information about individual emails that failed DMARC. They can include headers and sometimes even parts of the message, helping to pinpoint the source and nature of a spoofing attack. Due to privacy concerns, not all mail servers send RUF reports.
- Policy Enforcement: This is where DMARC tells receiving servers what to do with emails that fail authentication. You define this policy in your DMARC record.
DMARC Policy Tags Explained: `p=none`, `p=quarantine`, `p=reject`
The `p` tag in your DMARC record defines the policy for emails that fail DMARC authentication. It’s a progressive approach to enforcement.
- `p=none`: This is the monitoring-only policy. Emails that fail DMARC are still delivered to the recipient’s inbox, but you receive reports about these failures. This is the recommended starting point for any DMARC setup. It allows you to gather data from the `rua` aggregate reports, identify all legitimate sending sources, and fix any SPF or DKIM issues without impacting email deliverability.
- `p=quarantine`: With this policy, emails that fail DMARC are not outright rejected but are treated with suspicion. Receiving servers are instructed to place these emails in the recipient’s spam or junk folder. This is a good intermediate step after `p=none`, as it starts to protect recipients from spoofed emails while still allowing you to monitor the impact and refine your authentication records.
- `p=reject`: This is the strongest DMARC policy. Emails that fail DMARC authentication are completely blocked and not delivered to the recipient’s mail server at all. This provides the highest level of protection against email spoofing protection and phishing attacks, but it should only be implemented once you are absolutely confident that all your legitimate email sources are correctly authenticated with SPF and DKIM. Implementing `p=reject` prematurely can lead to legitimate emails being lost.
Understanding DMARC Alignment: Why SPF/DKIM Passes Aren’t Enough
A common misconception is that if SPF and DKIM pass, DMARC will automatically pass. This isn’t always true because DMARC introduces the concept of “alignment.” For DMARC to pass, the domain in the “From” header (the one users see) must align with the domain that passed SPF or DKIM.
- SPF Alignment: The domain in the “Return-Path” (or “Mail From”) header, which SPF checks, must match the domain in the “From” header.
- DKIM Alignment: The domain in the `d=` tag within the DKIM signature must match the domain in the “From” header.
If an email passes SPF or DKIM, but the domains don’t align with the “From” header, the DMARC check will fail. This is a critical distinction.
Relaxed vs. Strict Alignment
DMARC offers two modes for alignment:
- Relaxed Alignment (adkim=r, aspf=r): This is the default and more forgiving option. For SPF, it means the organizational domain of the “Return-Path” must match the organizational domain of the “From” header. For DKIM, the organizational domain in the `d=` tag must match the organizational domain of the “From” header. For example, `sub.yourdomain.com` would align with `yourdomain.com`.
- Strict Alignment (adkim=s, aspf=s): This is a stricter policy. For SPF, the “Return-Path” domain must *exactly* match the “From” header domain. For DKIM, the `d=` tag domain must *exactly* match the “From” header domain. This means `sub.yourdomain.com` would *not* align with `yourdomain.com`. Strict alignment offers stronger protection but requires more precise configuration.
How alignment prevents sophisticated spoofing.
Alignment is crucial because it prevents sophisticated spoofing techniques. An attacker could send an email that passes SPF (by using their own authorized server) and DKIM (by signing it with their own domain), but still try to trick recipients by putting your domain in the visible “From” header. Without alignment, SPF and DKIM would pass, and the email might reach the inbox. DMARC alignment, however, checks if the domain that *authenticated* (via SPF or DKIM) is the *same* domain that the user *sees* in the “From” field.
This ensures that the email’s apparent sender is genuinely authorized, significantly reducing the effectiveness of phishing and email spoofing attacks. I’ve used DMARC compliance monitoring to spot instances where a legitimate-looking email passed SPF and DKIM from a third-party, but failed DMARC because the “From” domain wasn’t properly aligned, indicating a potential misconfiguration or a subtle spoofing attempt.
How SPF, DKIM, and DMARC Work Together: A Real-World Scenario
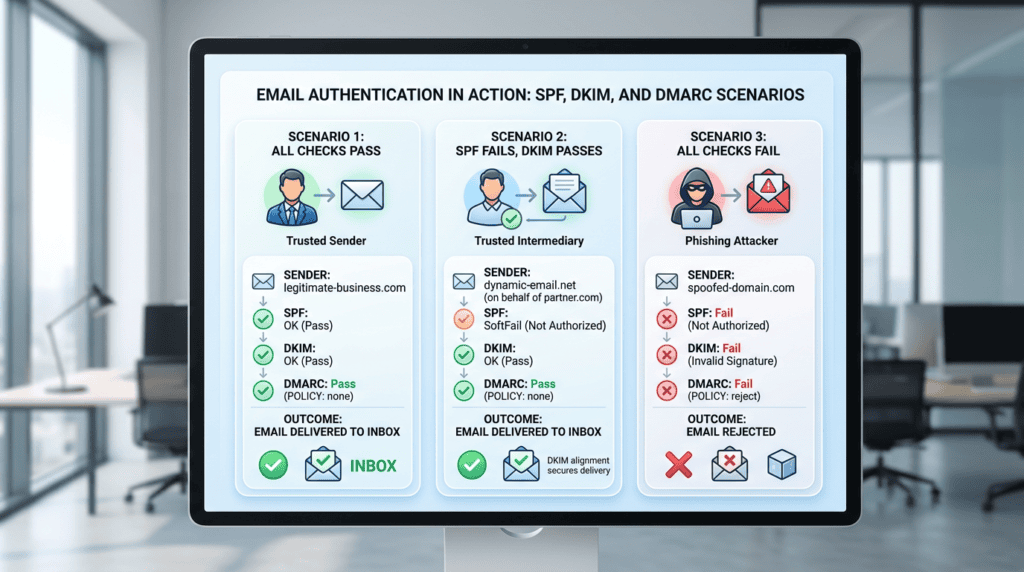
Understanding SPF, DKIM, and DMARC individually is one thing, but seeing how they interact in real-world email flows truly highlights their power. These email authentication protocols don’t operate in isolation; they form a layered defense that determines whether your messages reach the inbox or get flagged as spam. Let’s walk through a few common scenarios.
Scenario 1: All Checks Pass (The Ideal Outcome)
In the best-case scenario, your email sails through all the checks.
- Email is sent from an authorized IP (SPF pass). The receiving server checks your domain’s SPF record and confirms that the IP address of the sending server is listed as an approved sender. This means the email originates from a legitimate source.
- Email signature is valid (DKIM pass). Your email carries a valid DKIM cryptographic signature. The receiving server uses your domain’s public key from your DNS records to verify this signature, confirming the email hasn’t been tampered with since it left your mail server.
- Domains align (DMARC pass). Both the SPF and DKIM checks pass, and critically, the domains used in the “From” header (what the recipient sees) align with the domains validated by SPF and DKIM. This alignment is key for DMARC.
- Result: High confidence, straight to the inbox. When all three protocols pass and align, the receiving mail server has a very high level of confidence that the email is legitimate and hasn’t been spoofed or altered. This significantly boosts your email deliverability and ensures your messages land where they belong.
Scenario 2: SPF Fails, But DKIM Passes (Common with Third-Party Senders)
This scenario is surprisingly common, especially when you use third-party email service providers (ESPs) like Mailchimp, SendGrid, or HubSpot.
- Email is sent from a third-party service’s IP (SPF fail). Your ESP might send emails from its own IP addresses, which might not be explicitly listed in your domain’s SPF record. This can cause the SPF check to fail because the sending IP address doesn’t directly match your domain’s authorized list.
- Email signature is valid (DKIM pass). Even if SPF fails, your ESP typically signs the email with your domain’s DKIM private key. The receiving server successfully verifies this DKIM signature using the public key published in your DNS.
- DKIM domain aligns (DMARC pass). Because the DKIM signature is valid and the domain used in the DKIM signature aligns with your “From” header domain, DMARC considers the email authenticated.
- Result: Still delivered, as DKIM provides authentication. In this case, DKIM acts as the primary authentication method. DMARC sees the valid DKIM authentication and alignment, and despite the SPF failure, the email is still considered legitimate and usually delivered to the inbox. This is a crucial point for many businesses relying on bulk email senders.
Scenario 3: All Checks Fail (A Clear Phishing Attempt)
This is where DMARC’s enforcement power truly shines, protecting your brand and recipients from malicious attacks.
- Email is sent from a spammer’s IP (SPF fail). A malicious actor tries to send an email pretending to be from your domain. Their IP address is definitely not in your SPF record, so SPF fails.
- No valid DKIM signature (DKIM fail). The attacker doesn’t have access to your DKIM private key, so they can’t apply a valid DKIM cryptographic signature. DKIM verification fails.
- Result: DMARC policy (`p=reject`) tells the receiving server to block the email entirely. With both SPF and DKIM failing, and no alignment, DMARC steps in. If your DMARC policy is set to `p=reject`, the receiving mail transfer agent (MTA) is instructed to outright block or reject the email, preventing it from ever reaching the recipient’s inbox. This is how DMARC helps prevent email spoofing and phishing attacks. I’ve seen firsthand how quickly a `p=reject` policy can shut down impersonation attempts against a brand.
Implementing SPF, DKIM, and DMARC: A Step-by-Step Guide
Setting up SPF, DKIM, and DMARC might seem daunting, but it’s a structured process that significantly boosts your email security and deliverability. Think of it as building a robust security system for your email.
Step 1: Inventory Your Sending Services (Google Workspace, Mailchimp, SendGrid, etc.)
Before you touch any DNS settings, you need to know *who* is sending email on behalf of your domain. Make a comprehensive list of every service that sends email using your domain name. This includes:
- Your primary email provider (e.g., Google Workspace, Microsoft 365).
- Marketing automation platforms (e.g., Mailchimp, HubSpot, ActiveCampaign).
- Transactional email services (e.g., SendGrid, Postmark, Amazon SES).
- Customer support platforms (e.g., Zendesk, Intercom).
- Any custom applications or servers that send notifications.
Missing a sender is one of the most common reasons for authentication failures later on.
Step 2: Generating and Publishing Your SPF Record
Your SPF record tells the world which IP addresses are authorized to send email for your domain.
- Using an SPF record generator. Many online tools can help you build your SPF record. You’ll input your domain and select the services you identified in Step 1. The generator will output a `TXT` record string, typically starting with `v=spf1`.
- Adding the TXT record to your domain’s DNS settings. Log into your domain registrar (e.g., GoDaddy, Cloudflare, Namecheap) or DNS host. Navigate to your DNS management section and add a new `TXT` record for your root domain. Paste the generated SPF record string into the value field. Remember, you should only have one SPF record per domain. If you have multiple services, they should all be included in that single record using `include` mechanisms.
Step 3: Setting Up DKIM for Each Sending Service
DKIM adds a digital signature to your emails, verifying their integrity. Unlike SPF, you’ll often have multiple DKIM records, one for each major sending service.
- Finding the DKIM settings in your email service provider. Each service will have its own process. Look for sections like “Email Authentication,” “DKIM Settings,” or “Domain Settings.” They will provide you with specific `CNAME` or `TXT` records (often a pair of public and private keys, though you only publish the public key). These records usually include a `selector` (e.g., `s1._domainkey`).
- Adding the required CNAME or TXT record to your DNS. For each service, add the provided `CNAME` or `TXT` record to your domain’s DNS. The hostnames will be unique (e.g., `s1._domainkey.yourdomain.com`). Once published, the service can sign your outgoing emails, and receiving servers can use these DNS records for DKIM signature verification.
Step 4: Starting Your DMARC Journey with `p=none`
DMARC ties SPF and DKIM together and tells receiving servers what to do if authentication fails. You must start with a monitoring-only policy.
> Critical Warning: Never start your DMARC implementation with `p=quarantine` or `p=reject`. Always begin with `p=none` to gather data and avoid accidentally blocking legitimate emails.
- Why you MUST start with a monitoring-only policy. A `p=none` policy means that if an email fails SPF or DKIM and doesn’t align, the receiving server will still deliver it. However, it will send you DMARC reports. This allows you to identify any legitimate email sources that are failing authentication before you implement stricter policies.
- Setting up your DMARC record with a reporting address (`rua=mailto:`). Use a DMARC record generator to create your `TXT` record. It will typically look like `v=DMARC1; p=none; rua=mailto:your_email@yourdomain.com;`. The `rua` tag specifies where aggregate reports should be sent. These reports provide valuable insights into your email authentication status across the internet. Publish this `TXT` record for `_dmarc.yourdomain.com` in your DNS zone file.
Step 5: Analyzing DMARC Reports and Moving to Enforcement (`quarantine` then `reject`)

This is an iterative process that requires patience and attention to detail.
- Analyzing DMARC reports. Once your `p=none` DMARC record is published, you’ll start receiving XML reports (rua aggregate reports) from various mail providers. These reports detail which emails are passing or failing SPF and DKIM, and whether they are aligning. Tools are often necessary to parse these complex XML files into an understandable format. This analysis helps you identify any missing senders or misconfigurations.
- Moving to enforcement (`quarantine` then `reject`). Once you’re confident that all your legitimate email traffic is passing SPF and DKIM with alignment, you can gradually increase your DMARC policy.
- `p=quarantine`: This policy tells receiving servers to place unauthenticated emails into the recipient’s spam folder or quarantine them. This is a good intermediate step to catch any remaining issues without outright blocking.
- `p=reject`: Once you’re certain your email authentication is solid, you can move to `p=reject`. This policy instructs receiving servers to completely block any email that fails DMARC authentication. This is the strongest protection against email spoofing protection and phishing attacks, significantly improving your email sender reputation.
Honest Take: The Real-World Challenges of Email Authentication
While the benefits of SPF, DKIM, and DMARC are clear, implementing and maintaining them isn’t always a walk in the park. There are several real-world challenges that even experienced administrators face.
The “10 DNS Lookup Limit” for SPF and How to Manage It
One of the most persistent headaches with SPF is the “10 DNS lookup limit.” Your SPF record can only contain a maximum of 10 DNS lookups (mechanisms like `a`, `mx`, `ptr`, and `include`). Exceeding this limit will cause your SPF record to fail validation, rendering it ineffective.
> Tactical Takeaway: Regularly audit your SPF record. If you’re approaching the 10-lookup limit, consider consolidating `include` mechanisms or using an SPF flattening service, but be aware of the risks associated with the latter.
I’ve personally spent hours debugging SPF failures only to find a client had added too many `include` statements over time, pushing them past the limit. It’s a silent killer for email deliverability. Managing this often means being strategic about which services you `include` and sometimes even asking vendors for more efficient SPF entries.
The Complexity of DMARC Reporting and Why Tools Are Often Necessary
DMARC reports, particularly the aggregate `rua` reports, are sent in XML format. For a human, these raw XML files are incredibly difficult to read and interpret. They contain a wealth of data about IP addresses, authentication results, and policy actions, but without proper tools, it’s like trying to drink from a firehose. This complexity is why specialized DMARC compliance monitoring tools are almost essential. These tools parse the XML, visualize the data, and provide actionable insights, making it much easier to understand your email authentication performance and identify issues.
Why Full `p=reject` Enforcement Can Be a Difficult, Long-Term Goal
Achieving a `p=reject` DMARC policy is the gold standard for email security, but it’s a journey, not a destination. Many organizations struggle to reach this level of enforcement because it requires near-perfect email authentication across *all* sending sources. Any legitimate email that fails SPF or DKIM and alignment will be blocked, potentially disrupting critical communications. This means you need meticulous DMARC compliance monitoring, careful analysis of reports, and a willingness to troubleshoot and adjust configurations over an extended period. It’s a long-term commitment to email security best practices.
Managing Authentication Across Dozens of Third-Party SaaS Tools
In today’s digital landscape, businesses often use dozens of different SaaS applications, many of which send email on their behalf. Each of these tools might require its own SPF `include` or DKIM setup. Keeping track of all these configurations, ensuring they are correctly published in your DNS, and verifying their ongoing functionality can be a significant administrative burden. A new marketing tool, a forgotten internal application, or even a change in a vendor’s IP addresses can suddenly break your email authentication protocols, impacting your sender reputation and inbox placement rate.
Final Recommendation: Your Email Authentication Action Plan
If you’ve made it this far, you understand that email authentication protocols like SPF, DKIM, and DMARC aren’t just technical jargon; they’re fundamental to your email deliverability and overall sender reputation. My strongest recommendation is to start implementing these protocols today. Even if it’s just one step, the cost of inaction is too high.
Here’s a clear action plan:
- Inventory First: Begin by identifying every service that sends email on behalf of your domain. This includes your primary email provider (Google Workspace, Microsoft 365), marketing platforms (Mailchimp, ConvertKit), transactional email services (SendGrid, Postmark), and even CRMs.
- SPF Foundation: Check your domain’s DNS for an existing SPF record. If you don’t have one, generate a comprehensive SPF record that includes all your identified sending IP addresses and services. Publish this TXT record in your DNS zone file.
- DKIM Signatures: Work with your most critical email service providers to enable DKIM. This usually involves generating a DKIM public key and adding it as a CNAME or TXT record to your DNS. This cryptographic signature is vital for email security.
- DMARC Monitoring: Finally, publish a `p=none` DMARC record. This monitoring-only policy won’t affect email delivery but will start sending you valuable DMARC XML reports. These reports are crucial for understanding your email authentication status and identifying potential spoofing attempts.
Do not aim for perfection on day one; aim for progress. Properly configured email authentication is no longer optional – it is a fundamental requirement for anyone who relies on email for communication or marketing. Delaying this decision means your emails are more likely to land in spam folders, your brand is vulnerable to phishing attacks, and your overall inbox placement rate will suffer. Your sender reputation is on the line.
> Prioritize implementing SPF, DKIM, and a `p=none` DMARC policy immediately to protect your domain and improve email deliverability.
From my experience, the initial setup can feel daunting, but the peace of mind and improved email performance are well worth the effort.
FAQ: Common Email Authentication Questions
Do I need all three (SPF, DKIM, and DMARC)?
Yes, for comprehensive email security and deliverability, you absolutely need all three email authentication protocols. SPF verifies the sender’s IP address, DKIM ensures the email hasn’t been tampered with, and DMARC orchestrates the policy for how receiving servers should handle emails that fail these checks, providing reporting on authentication failures.
Can SPF, DKIM, and DMARC guarantee my emails won’t go to spam?
No, SPF, DKIM, and DMARC significantly improve your email deliverability rates and protect against spoofing and phishing, but they don’t guarantee inbox placement. Other factors like content quality, sender reputation, recipient engagement, and avoiding spam trigger words also influence whether an email lands in the inbox or the spam folder.
How do I check if my domain has SPF, DKIM, and DMARC set up correctly?
You can check if your domain has SPF, DKIM, and DMARC set up correctly by using online lookup tools. These tools query your domain’s DNS TXT records to verify the presence and syntax of your SPF record, DKIM public key, and DMARC policy, providing immediate feedback on their configuration and compliance.
What is the difference between `~all` (SoftFail) and `-all` (HardFail) in SPF?
The difference between `~all` (SoftFail) and `-all` (HardFail) in an SPF record determines how receiving servers treat emails from unauthorized IP addresses. `~all` suggests a SoftFail, meaning emails from unlisted IPs might still be accepted but marked suspiciously, while `-all` dictates a HardFail, instructing receiving servers to reject emails from any IP address not explicitly authorized in your SPF record.
How long does it take for DNS changes for SPF, DKIM, or DMARC to work?
DNS changes for SPF, DKIM, or DMARC records typically take anywhere from a few minutes to 48 hours to propagate globally across the internet. This propagation time, often referred to as TTL (Time To Live), depends on your DNS provider’s settings and how frequently DNS resolvers refresh their cached information.
What are BIMI records and how do they relate to DMARC?
BIMI (Brand Indicators for Message Identification) records allow you to display your brand’s logo next to your authenticated emails in supported inboxes, enhancing brand recognition and trust. BIMI relies on a strong DMARC policy (at `p=quarantine` or `p=reject`) to ensure the sender’s identity is verified before displaying the logo, making DMARC compliance a prerequisite for BIMI adoption.